Nội dung bài viết
Video học lập trình mỗi ngày
Sau khi ở part 2, devjs cũng đã hiểu vì sao chúng ta lại chọn buil a project with nodejs, expressjs, mongodb rồi. Và để tiếp tục Series này thì ở phần 3 này, chúng ta sẽ setup một project theo một quy chuẩn và rất phổ biến.
Yêu cầu làm được phần 3:
- - Hiểu về nodejs, expressjs, mongodb
- - Đã install được node, và mongodb
- - Đọc những bài viết trước về Series.
Series build a project
Đề tài: Build một blog + chat sử dụng nodejs, expressjs, mongodb, firebase
Part 1 - Vì sao mỗi developer nên có một blog
Part 2 - Vì sao lại phát triển web application sử dụng nodejs và expressjs?
Part 3 - Setup project with nodejs, expressjs và connect mongodb
Part 4: Tạo chức năng login và register sử dụng nodejs, expressjs, mongodb
Kiến trúc dự án
Dưới đây là kiến trúc của một dự án, mà rất nhiều blogger và trên github khuyến khích, các bạn có thể xem hình ảnh dưới đây.
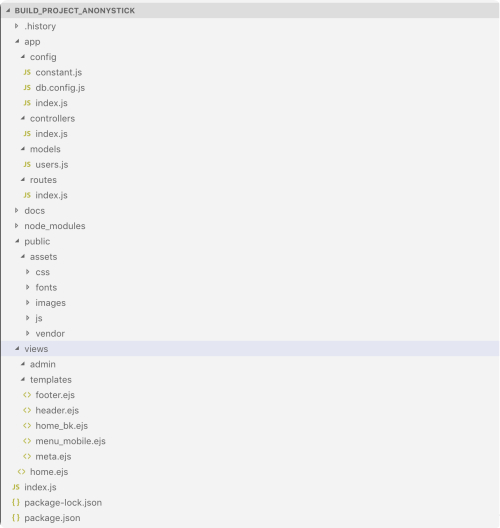
Các bạn có thể tạo như trên or tôi sẽ đưa lên github cho các bạn. Ở phần này quan trọng là các bạn có thể connect được với mongodb với localhost là xong.
Create Node.js App
$ mkdir build_project_anonystick
$ cd build_project_anonystick
Tiếp theo khởi tạo Node.js App với file package.json:
$ npm init -y

{
  "name": "build_project_anonystick",
  "version": "1.0.0",
  "description": "",
  "main": "index.js",
  "scripts": {
    "test": "echo \"Error: no test specified\" && exit 1"
  },
  "keywords": [],
  "author": "",
  "license": "ISC"
}
Next, chúng ta tiếp tục install những package cần thiết như :
$ npm install express mongoose body-parser cors morgan ejs --save
Sau khi các bước trên hoàn thành thì file package.json như thế này.
{
  "name": "build_project_anonystick",
  "version": "1.0.0",
  "description": "",
  "main": "index.js",
  "scripts": {
    "test": "echo \"Error: no test specified\" && exit 1"
  },
  "keywords": [],
  "author": "",
  "license": "ISC",
  "dependencies": {
    "body-parser": "^1.19.0",
    "cors": "^2.8.5",
    "ejs": "^3.0.2",
    "express": "^4.17.1",
    "mongoose": "^5.9.9",
    "morgan": "^1.10.0"
  }
}
Notes: npm init -y khác với npm init là nó bỏ qua những bước của init thôi, chứ có có magic gì ở đây.
Setup Express web server
Trong root folder chúng ta tạo file index.js
#create file index.js
const express = require("express");
const bodyParser = require("body-parser");
const cors = require("cors");
const morgan = require('morgan')
const mongoose = require('mongoose')
const _CONST = require('./app/config/constant')
const DB_MONGO = require('./app/config/db.config')
const app = express();

var corsOptions = {
  origin: "http://localhost:8081" // co thể sau này nó là resfult api, cứ để sẵn
}
app.use(morgan('combined')) //theo dõi log GET, POST...

app.use(cors(corsOptions)); //cross domain...

app.use(express.static('public', {'extensions': ['jsx']} ));
app.set('view engine', 'ejs');


// parse requests of content-type - application/json
app.use(bodyParser.json());

// parse requests of content-type - application/x-www-form-urlencoded
app.use(bodyParser.urlencoded({ extended: true }));

connect(); //Connect to Mongodb
function isOkay(){
	console.log('connect to mongodb is OKay');// check mongodb có kết nối thành công hay không
}

function connect() {
	mongoose.connection
	  .on('error', console.log)
	  .on('disconnected', connect)
	  .once('open', isOkay);
	return mongoose.connect(DB_MONGO.url, { keepAlive: 1, useNewUrlParser: true });
}

require('./app/routes/')(app); //importing route

const PORT = process.env.PORT || _CONST.PORT;
app.listen(PORT, () => {
  console.log(`Server is running on port ${PORT}.`);
});
Trong đó, file db.config.js
/app/config/db.config.js

module.exports = {
    url: "mongodb://admin:Anonystick@127.0.0.1:27017/anonystick"
}
file routes/index.js
/app/routes/

'use strict';
const index_Controller = require('../controllers/')

module.exports = function(app) {
    app.route('/api/test').get(index_Controller.test);
    app.route('/').get(index_Controller.home);

}
Notes: Riêng về phần install mongodb thì các bạn có thể đọc ở đây. Hướng dẫn install Mongodb Và middleware morgan là gì? Thì đọc bài viết này, và xem trong này mình cần những middleware nào nữa không? 3 middleware hữu ích khi sử dụng express rest api
Connect mongodb với localhost
Nếu bạn nào đang sử dụng MacOS thì các bạn có thể làm theo hướng dẫn nhanh dưới đây:
Đầu tiên run :
$ brew install mongodb
Nếu có lỗi Error: No available formula with the name "mongodb". Thì chạy lệnh này;
$ brew tap mongodb/brew
Tiếp, install phiên bản mới nhất là 4.2
$ brew services start mongodb-community@4.2
Sau khi thành công thì, thử insert một item xem sao, sau đó set quyền cho mongodb Có thể xem chi tiết ở đây: Mongodb create database and user terminal
$ mongo

> db
test
>
>
>
> use anonystick
switched to db anonystick
> db.test.insertOne({name: 'anonystick'})
{
	"acknowledged" : true,
	"insertedId" : ObjectId("5e992b9f67b97546868a8b7e")
}

>
>
> db.test.find()
{ "_id" : ObjectId("5e992b9f67b97546868a8b7e"), "name" : "anonystick" }

> db.createUser(
...   {
...     user: "admin",
...     pwd: "Anonystick",
...     roles: [ { role: "readWrite", db: "anonystick" } ]
...   }
... )

> exit
Sau khi chạy thành công thì thử connect localhost bằng câu lệnh sau:
$ mongo "mongodb://admin:Anonystick@127.0.0.1:27017/anonystick"
Nếu thành công thì nó sẽ xuất hiện:
MongoDB shell version v4.2.5
connecting to: mongodb://127.0.0.1:27017/anonystick?compressors=disabled&gssapiServiceName=mongodb
Implicit session: session { "id" : UUID("769da42a-852a-4823-b6e6-dc5faa69b301") }
MongoDB server version: 4.2.5
Ngược lại là sai như thế này:
MongoDB shell version v4.2.5
connecting to: mongodb://127.0.0.1:27017/anonystick?compressors=disabled&gssapiServiceName=mongodb
2020-04-17T11:29:10.924+0700 E  QUERY    [js] Error: Authentication failed. :
connect@src/mongo/shell/mongo.js:341:17
@(connect):2:6
2020-04-17T11:29:10.928+0700 F  -        [main] exception: connect failed
2020-04-17T11:29:10.928+0700 E  -        [main] exiting with code 1
Fix connect mongodb localhost.
Nói về lỗi connect localhost này thì nhiều lỗi, nhưng chúng ta dựa vào file log của mongodb để check mà thôi
$ cat /usr/local/var/log/mongodb/mongo.log
Ở đó, chúng ta sẽ biết lỗi ở đó, ví dụ tôi sẽ nhập sai pass thì nó sẽ báo thế này.
2020-04-17T11:22:23.594+0700 I  ACCESS   [conn128] SASL SCRAM-SHA-1 authentication failed for anonystick on admin from client 127.0.0.1:50165 ; UserNotFound: Could not find user "anonystick" for db "admin"
2020-04-17T11:22:23.594+0700 I  NETWORK  [conn128] end connection 127.0.0.1:50165 (1 connection now open)
2020-04-17T11:22:24.099+0700 I  NETWORK  [listener] connection accepted from 127.0.0.1:50166 #129 (2 connections now open)
Start nodejs chạy localhost:8080
Sau khi hoàn tất và install như trên ta thử run node, bằng cách.
$ node index.js
Thử chạy trên trình duyệt : http://localhost:8080 ta sẽ thấy như hình ảnh sau:
Tạo form login, register cho quản trị viên
Vì thời gian cũng có hạn, và công việc của tôi cũng nhiều, chính vì thế tôi tạm thời kết thúc phần part 3 ở đây. Mong các bạn thông cảm. Ở phần tiếp theo, tôi sẽ tiếp tục tạo model mongoose, để thực hiện việc tạo User... Mời các bạn đón xem tiếp. Cảm ơn các bạn
Các bạn có thể lấy code tại link github, không có template đâu nhé. nếu muốn có vui lòng, kéo xuống và đăng ký tại Khởi động, Build một blog + chat sử dụng nodejs, expressjs, mongodb, firebase., vì nó dính tới bản quyền.
